I can’t leave Android because of these 8 hidden features

I’ve been on Android my whole life. But if you ask me why, I can’t point to one big thing or feature. It’s actually all the small stuff I’ve gotten used to over the years — things like clipboard history, reverse wireless charging, app pinning, notification history, and app pairs — that make ditching Android almost impossible for me.

Heck, a few of these are so underrated that even longtime Android users don’t know they exist. I don’t blame them, though. Google just doesn’t talk about these features enough, so this list is my attempt to fix that.Which of these Android features do you think is underrated?

Notification history

If you’ve ever swiped away an important notification — or worse, hit that “Clear all” button by accident — Android has a feature that can bring those notifications back. The only catch is that it’s not enabled by default, which means you’ll need to turn it on before it can start logging anything.

Head to Settings -> Notifications -> Notifications history and turn on the toggle. Once you do, Android will keep a 24-hour log of every notification you get. Interestingly, this can also help you catch WhatsApp or Instagram messages that someone deleted after sending.

App pairs

Split-screen is easily one of Android’s best productivity features. It lets you scroll through Instagram Reels while replying to messages, watch a YouTube video while reading an article, or take notes during a video call. There’s plenty of room to get creative with it. What a lot of people miss, though, is that you don’t have to keep setting up the same combinations manually every time.

Once you have two apps in split-screen, open the recent apps menu, tap the pair icon at the top, and choose Add/Save app pair. This adds a shortcut to your home screen that lets you open both apps in split-screen view with a tap.

Reverse wireless charging

Most high-end Android phones support wireless charging at this point. But some of them, like the Galaxy and Pixel phones, also support reverse wireless charging. This basically turns the back of your phone into a small charging pad for your earbuds, smartwatch, or even another phone. Sure, you can also use a cable for this, and it’s honestly much faster, but if you don’t have one handy, this is a useful alternative.

To use it, enable Wireless power sharing from Settings -> Battery, then place the device you want to charge on the back of the phone. It’s useful in emergencies, though it’s not something I’d suggest you use for everyday charging.

Clipboard history

By default, Android can only remember the last text snippet or the image you copied. Once you copy something else, the previous item is gone. Gboard has a feature that can help with this. Open it inside any app, tap the clipboard icon on the toolbar, and enable Clipboard history.

From then on, everything you copy will show up on this list, and you can paste it whenever you need it. Gboard automatically clears these entries after an hour or so, which means you don’t have to delete them manually. And the best part is that you can also pin specific items you need often, like your phone number, address, email, or anything else you need to paste regularly.

App pinning

App pinning is a feature that can lock your phone to a single app, and it’s honestly one of the easiest ways to make handing your phone to a friend or a kid stress-free. All you have to do is open the recent apps overview, tap the app icon, and choose Pin to screen. If you don’t see the option available, you’ll need to enable it first by following this path: Settings app -> Security & privacy -> More security & privacy -> App pinning -> Use app pinning.

After this, the other person can’t switch apps, check notifications, or even go to the home screen. To get out, swipe up and hold (or press the back button if using 3-button navigation), then unlock the device. I find it perfect while handing my phone to my kid to watch YouTube or play a game.

Circle to Search text actions

Circle to search is hardly a secret, really. But it’s not just for looking up things. One of its most useful tricks is grabbing text from any screen — a screenshot, video frame, or an app that blocks copying.

Long-press the home button or navigation bar to open Circle to Search, then circle or tap the text you want to copy or translate. And it gets better. If you select a phone number or email address, you can tap to start a call or send an email.

Live Caption

Live Caption is a feature that can add subtitles to any video that you’re watching on your phone even when it’s muted. It’s especially handy when you don’t have earbuds and don’t want to disturb people around you. I use it all the time while watching Reels that don’t have subtitles or checking voice notes in public.

It’s technically an accessibility feature, but that doesn’t mean you can’t use it. You can find it under Settings -> Accessibility -> Hearing enhancements. On most phones, you can also trigger it from the volume panel. The caption box is flexible, too, so you can drag it around the screen to keep it out of the way and change the text style.

Reduce or disable animations

Every time an app opens, a window closes, or a menu slides in, Android plays a short animation to smooth out the transition. They look great, sure, but they also take time and require processing. Speeding up or disabling those animations is a neat way to make your phone feel snappier.

Of course, this isn’t something you need to do on a flagship phone. But if you’ve got a budget Android phone or one that’s struggling to keep up, this is definitely worth trying. This option is tucked away in Android’s Developer Options menu, so you’ll need to enable it first.

Then go to Settings -> System -> Developer options and lower Window animation scale, Transition animation scale, and Animator duration scale. Turning them off entirely cuts animation entirely, which can feel a bit abrupt, but it’ll surely make your phone feel much faster.

That’s my list. I’m honestly surprised Google keeps so many of these buried or switched off by default. Do you have an Android feature like this that you use all the time? 

‘Cheap iPhone deal’: warning over scam sites selling latest Apple mobiles

Criminals exploit demand for iPhone 18 Pro and foldable Duo to trick people eager to get their hands on one

Apple has just launched a range of new iPhones, including a foldable handset, just as you decide it is time to replace your own ageing mobile. But you balk at the £1,199 price tag for the cheapest of the new options.

Searching online for a better price with the words “cheap”, “iPhone” and “deal”, you come across a website which offers an iPhone 18 Pro for a couple of hundred pounds less than the Apple site. You pay for the new phone via a bank transfer and wait for it to arrive.

But the website is a fraud – one of hundreds set up in the days before the new Apple phones were announced – and is designed to scam money out of people eager to get their hands on one of the new handsets.

Apple unveiled the iPhone Duo, the company’s first foldable phone, on Wednesday, as well as two new iPhone 18 Pro models.

At the same time, criminals were building up networks of fake sites. Security researchers found a large spike in the number of scam sites registered with “Apple” and “iPhone”, among other keywords, in their domain names.

It is expected that the number will proliferate into the hundreds.

Alexandre François, who investigates scams for the intelligence company WhoisXML API, says the days before and after the announcement of the phones typically see a glut of domain names being registered by criminals. Some are then developed into phishing sites in order to dupe people.

“Some are flagged as dangerous by dozens of security engines, yet they are still absent from the blocklists that browsers and security tools rely on, so for most people nothing stops the page from loading,” he says.

“In each of the last four iPhone launches, domain registrations referencing the new model peaked on ‘keynote day’ – the launch day itself: more than 200 new domains within 24 hours, against zero or one on a normal day.”

What it looks like

The domain names will often include words such as “Apple” and “iPhone 18”. The content of a developed site will look convincingly realistic as fraudsters frequently use AI to mimic genuine retailers.

One site found by François, an iPhone Pro Max, in three different colours, was advertised with claims of an “all-day battery”.

The release of technical specifications following the launch allows fraudsters to build more convincing websites. François says it then “becomes much easier to convince people that what they are looking at is a real iPhone”.

The sites may also claim to offer early access to the devices, as well as cheaper prices. The new iPhone 18 Pro starts at £1,199 officially, while the 18 Pro Max at £1,299, so expect the scam sites to quote prices substantially lower.

As with many scams, fraudsters may give people a deadline to buy – such as a few hours – to encourage them to abandon caution in a bid to land a bargain.

The sites will often only take payment via bank transfer to avoid giving people the protections available when you pay with a debit and credit card.

What to do

Remember what is on sale. So far, the iPhone Duo and the 18 Pro and 18 Pro Max have been announced – but not the standard iPhone 18. Pages which claim to be selling it now or taking deposits are fakes.

François says Apple does not operate lotteries and does not recruit people to test phones.

Legitimate websites will offer consumers a variety of ways to pay – debit and credit cards among them. Some fraudulent sites will insist payment is made using cryptocurrency, which should act as an immediate red flag.

Apple says its Safari browser has a warning for fraudulent websites that alerts users to phishing or malware sites.

If you find you have given out your financial details, contact your bank and Report Fraud. And then change your passwords.

5 Habits That Help Keep Your Passwords and Other Data Secure

The number of publicly reported data breaches, exposures and leaks increased by 78 percent in 2023 — a leap not altogether expected because of a slight decrease in cases from 2021 to 2022, according to a report from the nonprofit Identity Theft Resource Center in El Cajon, California.

If your personally identifiable information such as name, address, account numbers, email addresses, health data, login information, Medicare ID, passport numbers, passwords, Social Security number or telephone number was among the more than 350 million records that were copied, inadvertently exposed or even ransomed, taking immediate steps to prevent identity theft is paramount. 

Having your name and address on the dark web might not be much of a problem by itself; that information used to be publicly available in the phonebook. But when scammers can match data with other pieces of information from your life, the risk increases that they could impersonate you elsewhere or target you personally for fraud.

Password security

• How to build a better password

• Members Only: Frustrations

• Using a password manager

• The future of logging in

• Data safety habits to cultivate

Artificial intelligence (AI) helps that linking happen more quickly. Some people last year had data stolen two or more times. The number of people living in the U.S. is less than 340 million, the Census Bureau says.

Even if you’ve managed to slip under the radar of the worldwide web of hackers, you should make a vow to create stronger, more secure passwords to keep your data safe. After you’ve altered your scores of passwords to be lengthy and unique, you’ll still have to take steps to make cybersafety second nature.

1. Know how to lock your docs

If you’re used to writing passwords on sticky notes, you’re not alone. Nearly half of Americans age 50 to 64 say they “always,” “almost always” or “often” write down their passwords, a practice that makes security experts cringe, according to a Pew Research Center survey in October 2023. That percentage jumps to nearly two-thirds of respondents 65 and older.

Rather than writing passwords on a sticky note, some people keep a list of passwords on their computer in a spreadsheet, word processing document or notes app. If you do, encrypt or lock the file.

Here’s how:

On a Windows PC in an open Microsoft Word document, click File | Info | Protect Document | Encrypt with Password. Then create a password.

On a Mac with an open Word document, click on Review | Protect Document in the ribbon atop the story. You can set a password to open or modify the document or both. Hit OK.

For Mac users who have Pages as a built-in word processor, choose  File | Set Password and enter a desired password. You’ll be asked to type it a second time. Apple recommends adding a password hint. You have the option of checking a box to save it to your iCloud Keychain, a built-in password manager for Apple devices, then click Set Password.

2. Change your passwords regularly

If you work or worked recently for a large company, you probably were required to change your password every 90 days. You may have seen a countdown calendar tucked among the many icons on yourcomputer screen.

Cybersecurity experts remain divided on the frequency of modifying passwords, but most suggest every three months. Set a calendar reminder or think about it as part of your routine when the seasons change.

If you learn either through news reports or notification from a company whose systems were hacked that your account was compromised, change that particular password immediately — and maybe some others if you’ve been a password recycler. Don’t delay.

Making minor changes to an old password is not helpful, the National Institute of Standards and Technology says. Attackers can apply the same minor tweaks to gain access to your accounts.

3. Install antimalware apps, keep them updated

If you don’t have antivirus software on your devices, install reputable apps such as Bitdefender, McAfee or Norton, to protect you from ransomware, spyware, Trojan horses, viruses and worms. Device manufacturers, eager to tamp down attacks on their equipment and their reputations, are including more of this security free with purchase.

Whether you decide to add third-party protection for a subscription or stay with what’s free, keep the software updated. You can set your devices to automatically update operating systems and antivirus software, so you don’t have to remember. Set updates for your hardware, too, such as a wireless router and printer.

4. Use two-factor authentication or a VPN

Make it tougher for cybercriminals to access your online accounts by adding a second layer of defense. Multifactor authentication, also known as two-factor authentication, adds a layer of security on top of your password or biometrics with a onetime code typically texted to your mobile phone, sent to your email account or even called via voice bot to your landline telephone.

Or you can opt for a virtual private network (VPN) that connects to a secure, encrypted server, keeping you anonymous and safe even if you’re accessing  public Wi-Fi.

5. Be prepared for your death

After years of online activity, our digital footprints become our legacy of sorts.

Getting your accounts organized and your passwords secure will help your loved ones deal with your affairs when you die.

Some websites and password manager apps let you identify a digital beneficiary to access your accounts. The key is to let that person know in advance, so they’re prepared to follow your wishes and can access your digital vault.

How to transfer contacts to a new Android phone

Congratulations on your new phone purchase! Doesn’t matter if you bought a top Android phone or something in the mid-range; you need to know how to migrate all your data from your old phone to the new phone. If you’re wondering how to do that, here’s how to transfer contacts from an old Android phone to a new Android phone.

How to transfer contacts to a new Android phone

Most Android phones ship with Google apps and services pre-installed, and that makes it very easy and seamless to transfer contacts. All you have to do is ensure that your Google account is set to sync contacts on the old phone and then use the same Google account on the new phone.

The same steps apply to practically all Android phones, regardless of manufacturer, Android version, or the phone’s contacts app. There may be some variations in the option names (like “Accounts” could be called “Accounts and backup”), but the idea remains the same.

Here are the steps you need to follow:

  • On your old phone, go to Settings > Accounts > Manage accounts.
  • Select your Google account here. If you have only one Google account set up, it will be selected by default. If you have multiple Google accounts on your phone, select the primary account that you want the contacts to be saved in. Note that you will need to use the same primary Google account on your new phone.
  • Select Sync account.
  • Here, ensure that the Contacts option is enabled and that it was recently synced.
  • If the sync is over a day old, click the three-dot menu button on the top right corner and select Sync now. This will ensure that your contacts are backed up online to your Google account.

How to transfer contacts on Android Google account sync 

  • Optional but recommended: Verify your contacts at contacts.google.com. You will find that all your contacts have been uploaded.
  • On your new phone, you need to sign in to the same primary Google account.
  • Most phones will prompt you to sign in to a Google account during setup.
  • If not, you can add a Google account post-setup by going to Settings > Accounts > Add account > Google.
  • Once your Google account is signed in on your new phone, it will automatically sync your contacts to your new phone in a few minutes.
  • You can check if contact sync is enabled by going to Settings > Accounts > Manage accounts, selecting your primary Google account, and enabling the Contacts option. The sync date should be very recent.

And that’s it. You can now open the Contacts app to verify that your contacts have been carried over.

The steps may look complicated, but the process is very straightforward. Once you have the settings in place, you don’t have to worry about losing any contacts anymore, even if your phone gets stolen or misplaced.How to manually transfer contacts to a new Android phone

While the method above is very seamless and effective, you can never be too careful. You can take a manual backup of your contacts to be doubly sure that nothing is lost and that all your contacts are transferred to your new Android phone. This method is also helpful for historical archival purposes, and it also helps if you want to transfer the contacts to other services.

Follow these steps to generate a vCard file (vcf) of your contacts on your old phone:

  • Exporting contacts from a Samsung phone:
  • Open the Contacts app on your old phone.
  • Click on the three-dot menu button in the top right corner.
  • Click Manage contacts > Export contacts.
  • Now, you can select which contacts to export (you can choose the All contacts option) and where you’d like to export the contacts to (you can choose Internal storage).
  • Click Export.
  • Your contacts have now been successfully exported to a Contacts.vcf file on your internal storage.

Exporting contacts from a Google Pixel phone or a OnePlus phone:

  • Open the Contacts app on your old phone.
  • Click on Fix & Manage > Export to file.
  • Here you can choose where you want to save the file and what you want to name it.
  • Click Save.
  • Your contacts have been successfully exported.

Once you have a vCard file (vcf) generated, you need to transfer it to your new Android phone. You can save the file online on services like Google Drive, use Nearby Share, or any other method, like emailing the file to yourself.

Once you have the file on your new phone, you need to import it.

Importing contacts to a Samsung phone:

  • Open the Contacts app on your new phone.
  • Click on the three-dot menu button in the top right corner.
  • Click Manage contacts > Import contacts.
  • Locate and select the vCard file.
  • Select where you want to import the contacts to. We recommend importing them to your primary Google/Gmail account, as it will then automatically sync your contacts, and you wouldn’t have to worry about them the next time you move from one Android phone to another.
  • Select Import.

Importing contacts to a Google Pixel phone or a OnePlus phone:

  • Open the Contacts app on your new phone.
  • Click on Fix & Manage > Import from file.
  • Choose where to save your imported contacts. We recommend importing them to your primary Google/Gmail account, as it will then automatically sync your contacts, and you won’t have to worry about them the next time you move from one Android phone to another.
  • Locate and select the vCard file.
  • The phone will begin importing contacts, and the process will be complete within a few seconds.

How to Use Your Smartphone to Scan Documents

Your smartphone, with its built-in camera, can help you take some extraordinary photos but the camera can also double as a pretty good flatbed scanner.

It’s ideal for digitizing photos in albums, within frames or on a wall. But it also can convert paper business cards you’ve been collecting, documents you need to keep with you, notes on projects, receipts for expense reimbursement and even whiteboards on which you’ve been brainstorming. You then can store those images or send them to someone via email or text.

A scan really means taking a photo, but the technology goes beyond that. Along with adding color correction to photos and magically repairing tears, some scanner apps include optical character recognition (OCR), which can translate typewritten and even handwritten words into editable and searchable text. When you scan a newspaper article without OCR, your smartphone saves the story as an image file, but you won’t be able to search for a keyword or copy specific sentences to text a friend.

Here’s a look at how to scan something using your phone, with either built-in tools or free apps.

How iPhone, iPad owners can use the Notes app

You can use the Notes app to scan documents and photos as well as add a handwritten signature using your fingertip.

1. Open the Notes app and create a note by tapping the memo icon in the lower right corner of your screen. Or select an existing note.

2. Tap the camera icon at the bottom of the screen and select Scan Documents, even if you want to scan a photo.

3. Place whatever you’re scanning in view of the camera. If your device is in Auto mode, your document will automatically scan. If you need to manually capture a scan, tap the shutter button or one of the volume buttons.

4. In the lower left corner of your screen, tap the image of the photo you just took to edit it.

5. The crop tool icon, also in the lower left corner of the succeeding screen, allows you to drag the corners of the scan to adjust it. Then tap Done. The next icon to the right allows you to determine whether you want to save a color scan, grayscale scan, black-and-white scan or color photo; experiment among them for the best version of your scan. The next icon rotates the image 90 degrees each time you tap it, and the trash icon discards your work without giving you a chance to cancel.

6. Hit Done to finish with that scan or Retake to try again.

7. Hit Save to keep the scan, which can have several scanned documents within it.

If the document needs to be signed, follow these additional steps.

1. Open the Notes app, and then tap the document in the note.

2. Tap the share button, which is at the top right of your screen and looks like a square with an arrow pointing up. At the bottom of a list, tap the markup icon that looks like a pen tip in a circle. You may need to scroll up a little to see that option.

3. Sign, using your fingertip or a stylus. You can use your fingers to zoom in and out of the document before you sign to make the space larger or smaller. Different pen and marker options are available at the bottom of the screen, and an eraser is available if you don’t like your first try.

4. Tap Done. 

Google Drive, built into Androids, also available for iPhones

If you own an Android smartphone but don’t see the colorful triangle icon on your home screen, search for the word “drive” and it will pop up. iPhone users can download Drive from the Apple App Store.

These instructions may vary a little based on the Android device, but it should be easy to follow along:

1. Open the Google Drive app, and at the bottom right, above the Files icon, tap + New.

2. Tap the Scan icon.

3. Choose how you will allow Drive to take pictures and record video: While using the app, Only this time or Don’t allow. The last option will mean you cannot use the app.

4. Position the document that you’d like to scan. The camera should automatically take its picture. If it doesn’t, check to see whether the scan feature is in Auto capture mode. If it’s in Manual, tap Auto capture to the right.

5. Choose to Crop & Rotate, Filter, Clean, Retake or Delete, or not. Experiment with settings in the first three sections, and you can discard anything before it’s saved.

6. Scan more pages to the same document by tapping the + plus sign to the right of a thumbnail of the document you just captured, editing them as needed. Tap Done when you’re satisfied.

7. Decide whether you want to change the name of the PDF just generated. If so, you can erase the name and type something new. Hit the Save button in the upper right corner when you’re done.

Every Google account starts with 15 gigabytes (GB) of free storage shared across Google Drive, Gmail and Google Photos, but you can pay for more or choose to download and save your scans to your phone’s memory.

Microsoft Lens caters to Office lovers

Microsoft’s Lens, available for both iPhone or Android, is free, easy to use and has reliable optical character recognition that supports several languages.

Its software can remove shadows and odd angles, so your images are easier to read. When you’re done, you can upload document and whiteboard images to Word, OneDrive, OneNote or PowerPoint, and you can save them as PDFs or send them by email or text.

To get going, open Lens and choose your mode: Business Card, Document, Photo or Whiteboard. That way, the app can improve the kind of image you’ve photographed automatically:

Business Card mode pulls out relevant contact information and populates that person’s contact card in your phone.

Document mode is ideal for making out small words on, say, a restaurant menu or flyer.

Photo mode has many filters to enhance the image.

Whiteboard mode is better for capturing notes, maybe even sketches, and the app will adjust images so the background isn’t too bright and the words are easy to read.

Like the built-in apps, Lens also supports cropping, rotating and adding text.

More than 2.5 billion documents created, Adobe says

Adobe Scan, also available free for iPhone and Android, has been downloaded more than 150 million times and been used to create more than 2.5 billion documents, the company says. 

Like Lens, Adobe Scan can capture, save and organize your documents in JPG or PDF files, has optical character recognition and offers the ability to sign documents. But Adobe, famous in design circles for its Photoshop app, touches up photos in Scan, too, ideal if you’re saving old, faded or ripped photos.

To get going, launch the app. Auto Scan will be on by default, so hold up the camera to analyze and capture the image or import a photo from your phone’s gallery. For more precise scanning, you could manually select Business Card, Document, Form or Whiteboard.

When looking at a photo you’ve scanned, you can tweak its color, rotate it or select Cleanup, which lets you drag your finger over parts of the image to remove tears and improve lighting or color. Additional details are available on the official Adobe Scan help page.

A free Adobe account is required to use the app. Or sign in with an Apple ID, Facebook or Google.

While Adobe Scan is free, features are limited in the gratis area. After a seven-day trial, its optional Adobe Scan premium subscription for $10 a month lets you combine multiple scans into one file; save scanned files into Microsoft Word, Excel and PowerPoint formats, along with JPG and PDF; and store more files in Adobe’s Document Cloud with 20GB of storage, instead of 2GB.

The premium price unlocks extra OCR features, such as a 100-page limit instead of 25 for the free version. The subscription works across Acrobat Reader mobile and Acrobat web applications.

Own a Samsung phone? Changing these 7 settings will drastically improve the battery life

Your Samsung phone may already hold a solid charge, but with a handful of smart setting changes, you can make that battery last even longer.

Samsung’s Galaxy smartphones are some of the best Android phones available today, thanks to their responsive and feature-rich software. But most Samsung phones — especially the flagships like the Galaxy S25 Ultra, Galaxy Z Fold 7, and Z Flip 7 — come with over-the-top features that you might not use daily. 

If your new Galaxy phone isn’t lasting an entire day on a single charge, there are ways to make the most of what you have without hindering the user experience. 

Here are seven ways to maximize the battery life on your Galaxy phone. Fret not — I won’t be Captain Obvious over here and recommend reducing the screen resolution or using your phone at a lower refresh rate. The recommendations on this list should bring quality-of-life improvements while maximizing your handset’s efficiency. 

1. Use Dark Mode

Most Samsung phones feature AMOLED displays, which can control individual pixels. So, when you use a dark theme or dark wallpaper, the part of the screen that needs to stay black won’t turn on those pixels. This, in turn, reduces screen power usage and makes your battery last slightly longer. 

How to: Open the Settings app > Display. You’ll get two cards for Light and Dark. Tap on the Dark option. Alternatively, you can change the system wallpaper and continue using the light theme, but this will not have the same effect on battery as turning on the Dark mode.

2. Toggle on Adaptive Brightness

This setting ideally comes activated out of the box, but some people turn it off because it’s not always accurate. However, over the years, Samsung‘s ambient light sensor has improved in quality. Your Galaxy phone can reliably detect the lighting in your environment to automatically adjust the screen luminosity. This ensures your display is more efficient and isn’t brighter than needed.

How to: Go to the Settings app > Display and toggle on Adaptive Brightness. It should work in most environments, but if need be, you can adjust the brightness with a swipe down from the Quick Settings panel.

3. Locate and force stop or uninstall power-draining apps

Samsung phones come with a lot of pre-installed apps like Facebook, Microsoft 365, OneDrive, and a bunch of Samsung and Google apps. Identify the ones you don’t need, and uninstall or force disable them so they don’t run in the background. 

For example, not everyone needs the Samsung Smart TV app or OneDrive. When I set up a new Galaxy phone, I uninstall those two and others, including Facebook, Outlook, Microsoft 365, Tutor, and more.

How to: Tap and hold the app you want to uninstall. A pop-up menu will appear. Tap Uninstall. As a result, none of these non-required apps will use your battery.

4. Identify power-draining apps

Certain apps consume more power depending on your location, 5G connectivity, and background usage. Samsung lets you identify these power-hogging apps to help you minimize non-essential battery usage.

How to: On your Galaxy smartphone, you can identify power-draining apps by going to Settings > Battery and device care > Battery > Background usage limits and choose which apps you want to turn off. 

5. Download offline content before travel

If you take the same route every day or listen to the same playlists and podcasts, downloading that content offline is a good idea. Most streaming apps and Google Maps consume a lot of battery over 5G and LTE. When outdoors, it could also make your handset warm to the touch. You can tackle this with a bit of pre-planning: Download your favorite music or maps over Wi-Fi before you leave home.

How to: Go to the streaming apps you want to download content from and follow the in-app steps. For instance, YouTube has a download button on videos, and Spotify lets you download complete playlists.

6. Use scheduled Always-On Display

I love the Always-On Display (AOD) on my Galaxy S25 Ultra. It has an LTPO display that goes down to 1Hz for efficiency, which is handy for features like AOD. If you have a midrange Galaxy phone with a minimum refresh rate of 60Hz, using AOD might not be as efficient. However, you can be smart with it by scheduling AOD for when it’s needed.

For instance, I have it scheduled for 11 a.m. to 7 p.m., so I don’t miss any important notifications and have the needed info at my disposal at a glance. 

How to: Go to Settings > Lock Screen and AOD > Tap on Always On Display > When to show > As scheduled. While you’re at it, also turn off the Show lock screen wallpaper within AOD settings.

7. Use Performance profile

Samsung allows you to choose a performance profile according to your usage. If you don’t play games and use your phone primarily for regular tasks like browsing, calling, and the like, you should choose the Light Performance profile over Standard. It will prioritize battery life and cooling over processing speed.

How to: Open the Settings app and go to Device care > Performance profile and select Light. This is ideal for average phone users.

What to do when my Galaxy phone is low on battery?

The seven settings above will not hinder your user experience and will retain the best Galaxy phone features. However, if you’re out and your phone is low on battery, you should:

Turn on Power Saving

Toggle off data roaming

Turn off location services

Switch off AOD altogether

Also: I love my Samsung Galaxy Buds 3 Pro – but I wish I had Apple or Google earbuds instead. Here’s why

I recommend turning on these settings when your phone’s battery level is under 15% but you’re still a few hours away from the charger. The above-mentioned Samsung settings will also help you maximize the battery on your Galaxy phone.

How to change app icons on any Android phone

App icons are a little bit difficult in stock Android. You can’t change them natively, so you’ll need a third-party tool along with an icon pack in order to do it. Once you have everything ready, it’s not terribly difficult to switch up your icons. Here’s how to change icons on your phone on Android.How to change app icons individually

Changing icons individually isn’t a difficult task. However, most Android phones don’t have this capability natively. For most folks, you’ll need a third-party launcher like Niagara, Action Launcher, Lawnchair, or something similar. We have a list of the best launchers if you need suggestions.

The below tutorial uses Nova Launcher, but really should work for any third-party launcher.

  1. Install the icon pack of your choosing along with Nova Launcher.
  2. Set up your Nova Launcher home screen as needed.
  3. Once ready, find the app icon on your home screen you want to change.
  4. Long press the app and tap the pencil icon.
  5. Tap the icon image on the left side of the window.
  6. Select your icon pack.
  7. Finally, select the icon you want.
  8. Once finished, press the Done button.

We use a third-party launcher in the tutorial above, but you can also use a shortcut maker app from the Google Play Store to theme individual icons if you’re using your stock launcher. However, the ones we tested add an extra shortcut graphic to the icon, so it may not be everyone’s cup of tea.

How to change all of the app icons with an icon pack

It is much faster and much easier to simply apply a whole icon pack. Unlike the previous method, you’ll want a third-party launcher for this. Once again, we’ll use Nova Launcher for this example, but any launcher with icon pack support should be able to do this.

  1. Install Nova Launcher, set it up, and install the icon pack of your choice.
  2. On your home screen, long-press a blank spot and tap Settings.
  3. Navigate to Look & feel.
  4. Tap Icon style.
  5. Next, tap Icon theme and select your icon pack.
  6. When you return to the home screen, your icons will be themed with the whole icon pack.

Most icon packs also have the ability to apply themselves, provided that you have a phone or a launcher installed that can take it. Typically, you can open the icon pack once downloaded, find the apply button, and apply it directly from the icon pack app.How to theme icons with Material You

Starting with Android 12, Material You has been the design language of Android. One of the benefits of that is the ability to theme icons. The icons change color based on your wallpaper, and it’s all handled in the Wallpapers and style section of your phone.

  1. Long press a blank space on your home screen and select Wallpaper and style.
  2. Find the Themed icons option and tick it on.
  3. That’s it. When you return to your home screen.
  4. On some devices, like Samsung, you may need to manually navigate to the color palette section before you find the themed icons option.

This isn’t a hardcore theme, but it does match the icons to your wallpaper, color palette, and whether or not you have dark mode enabled. It’s a quick and dirty way to match your icons immediately.How to change icons on a Samsung phone

Samsung users have an extra way to get icon packs without third-party apps. You can browse and purchase icon packs in the Samsung Galaxy Theme Store. These work with Samsung’s One UI launcher, so there is no need for a different launcher. You can even use icon packs from the Google Play Store using Good Lock’s Theme Park module. We’ll show you how to do both.

Samsung Theme Store

  1. Long press a blank space on your home screen and select the Themes option.
  2. Once the Theme Store opens, select the Icons option at the bottom.
  3. Find and download whatever icon pack you want.
  4. Once done, tap Menu at the bottom right, then My Stuff at the top left. Select Icons from the row along the top.
  5. Select the icon pack you want to install.
  6. Tap the Apply button.
  7. Once done, your icons will be themed.

Remember that Samsung Theme Store icon packs don’t theme every icon in your app drawer. Thus, this is not the best option.

Good Lock via Theme Park

Good Lock is not available on all Samsung phones in all regions.

  1. Download Good Lock along with the Theme Park extension from the Samsung Galaxy Store.
  2. Open Theme Park and navigate to the Icon tab.
  3. Hit the Create New button. This takes you to the main icon-theming screen in Theme Park.
  4. Using the options, select your general icon shape, icon color, and tray color.
  5. Optionally, you can click where it says Icon pack and select a third-party icon pack.
  6. Finally, to change individual icons, tap the 3-dot menu button at the top right corner and select Change icons.
  7. Select the icon you want to change, and then select the icon you want to change it to.
  8. Once you’re done configuring, go back to the aforementioned main icon-theming screen and tap the Save button at the top right corner next to the 3-dot button.
  9. Enter a name for your new, custom icon pack.
  10. Once done, you can apply the icon pack directly through Theme Park or through the Samsung theme store.

Theme Park has a bit of a learning curve, so take your time when you first go in there and familiarize yourself with its various functions. It’s quite powerful once you get used to it.

How to open Control Center on your iPhone without swiping from top: 4 easier ways

You shouldn’t have to perform finger gymnastics just to adjust your screen brightness. Try these alternative ways to open Control Center – no stretching required.

Do me a favor: Grab your iPhone and try opening Control Center one-handed. Bet you can’t, or at least it isn’t easy.

It’s a shame, because that’s where Apple tucks all its quick toggles — from Wi-Fi and Airplane Mode to screen brightness and orientation lock. You’d think these iPhone settings would be easy to reach with one hand, but nope. As screen sizes have ballooned to 7 inches, swiping down from that top-right corner often feels like a literal stretch (especially if you’re juggling coffee or keys).

Fortunately, there are simple workarounds beyond the standard swipe that let you easily and quickly open Control Center.

How to launch Control Center (without swiping from top)

Here are four methods — you just need an iPhone running the latest version of iOS. 1. Reachability

Shift the screen down to your thumb

Reachability is an iOS feature that shifts the top half of your iPhone screen to within your thumb’s reach, making it much easier to tap the Control Center. To use Reachability, simply swipe down along the bottom edge of your display. This built-in gesture works anywhere you can swipe — whether you’re on the home screen or in an app. But you might need to enable it first. 

To enable Reachability, open Settings, then go to Accessibility > Touch, and toggle on Reachability.

To use Reachability on iPhone:

  • With your phone in one hand, swipe down on the bottom edge of the screen.
  • Tap the Control Center area in the top right, which should now be within reach.
  • Swipe up on the bottom edge again (or tap a blank area at the top) to return to full screen.

2. Back Tap

Double- or triple-tap your iPhone’s back

Have you heard of Back Tap? It’s a virtual button on the back of your iPhone. Once enabled, you can summon iOS features — including Control Center — with two or three quick taps. To enable Back Tap, open Settings and go to Accessibility > Touch > Back Tap, then choose Double Tap or Triple Tap, and assign Control Center.

To use Back Tap on iPhone:

  • Hold your iPhone like you normally would. 
  • Tap the back of the phone twice (or thrice).
  • If you’ve setup Control Center, it should instantly slide down.
  • The best part? Back Tap works even with a case on your iPhone. And you can use it anywhere, whether you’re on the home screen, scrolling TikTok, lurking in Instagram, or using any other app.

3. Home-screen shortcut

Create a home screen icon for Control Center

Old habits die hard, and tapping icons on the home screen is one of them. It’s a visual cue we use every day. 

If you want to turn Control Center into a home screen icon (essentially bookmarking it), all you need is Apple‘s Shortcuts app. Don’t worry — it’s not complicated and takes just a few seconds to set up.

To create your shortcut, open the Shortcuts app, tap the + button, search for and add the Show Control Center action, then hit Done. Back in the All Shortcuts view, tap the ••• on your shortcut, open its top dropdown menu, choose Add to Home Screen, and — if you like — customize the name, symbol, and color before tapping Add.

To use your home-screen shortcut on iPhone:

  • From any home-screen page, tap your new Control Center icon.
  • If you’re in another app, swipe to your home screen first and then tap your new Control Center icon.

4. Action button

Press your Action Button to toggle Control Center

OK this last one is exclusive to iPhone 15 Pro and 16 models with a physical Action button. Basically, with a press, it can run a shortcut and open things — like Control Center. 

To change what the Action button does, you’ll repeat some of the steps above. Open the Shortcuts app, select your Control Center shortcut, and edit the action from Show to Toggle (so it both opens and closes). Now, configure the Action Button: Go to Settings > Action Button, select Shortcut, and choose Control Center.

To use the Action button on your iPhone:

  • Press the side button once.
  • If set up, Control Center will slide down or disappear immediately.
  • By default, the Action button is set to silent mode. But you can access that setting in the Control Center.

What is Control Center?

Control Center is the iPhone‘s quick-access panel for settings like brightness, volume, connectivity options, media controls, and more. It’s all in one place and highly customizable, so you can choose what appears there. On newer iPhones without a Home button, swipe down from the top right of your screen to open it. Don’t swipe from the top left — that opens Notification Center.Do these workarounds work on all iPhones?

Reachability, Back Tap, and Home Screen shortcuts require iOS 14 or later.

The Action Button option is exclusive to iPhone 15 Pro and iPhone 16 models.

Can you combine methods?

Sure. There’s no harm in using all of them, and it’s handy to have multiple options for different scenarios.

Apple Face ID not working? Here’s how to fix it

Every recent iPhone, except the iPhone SE, and some iPads use Face ID as the biometric authentication option instead of a fingerprint scanner. It’s easy to set up Face ID on your iPhone or iPad, and you can use it to unlock your phone, sign in to apps, confirm Apple Pay transactions, autofill passwords, and more. Face ID is a quick and convenient security step on your device, but only when it works. Some users face problems with Face ID not working, but there are ways to solve the issue. If Face ID isn’t working on your iPhone or iPad, here’s what you can try to fix it.

QUICK ANSWER

To fix Apple Face ID not working, go to Settings > Face ID and passcode and check the various settings. Ensure that you’ve enabled Face ID for Apple services and third-party apps. You can also add an alternate appearance, train Face ID to work with glasses and masks, or reset Face ID and go through the setup process again. Don’t forget to update the device’s software, and simply restarting it might be enough if Face ID isn’t working because of a software glitch. Your only option is to send the device for repair if Face ID isn’t working because of a hardware issue.Why is my Apple Face ID not working?

Unless your iPhone or iPad has physical damage from an accidental bump or drop, Face ID not working is likely because of a software issue. If it is physical damage, your only option is to send the device in for repair. If your Face ID isn’t working, you’ll see error messages like “Face ID not available” or “Face ID has been disabled.” Other signs to look for include needing multiple attempts to unlock your phone and if you see a prompt to enter a passcode.

There are a few instances where the device may disable Face ID. The feature will stop working after five unsuccessful scans. You may need to enter your passcode if you’ve just turned on or restarted the device or if the device hasn’t been unlocked in more than 48 hours. Face ID will also not work if you’re on the Emergency SOS screen or if you’ve entered the device into Lost mode using the Find My app.

However, Face ID may also not work if there is an issue with the settings, something is blocking the TrueDepth camera, if you’re wearing a mask, the software isn’t updated, and general software bugs and glitches. There are some quick troubleshooting steps you can try, which should fix the problem if it is a software issue.How to fix Face ID not working

Check Face ID settings

There might be an issue with the Face ID settings, especially if it isn’t working with third-party applications. Go to Settings > Face ID and passcode and ensure that Face ID is enabled for the available features. You can enable Face ID to unlock the device and for Apple services like iTunes, the App Store, Wallet, Apple Pay, and Password Autofill.

If you’re having problems using Face ID with third-party apps, go to Settings > Face ID and passcode > Other apps and toggle on the apps you want to use with Face ID.Ensure that nothing is blocking the TrueDepth camera

Your iPhone or iPad uses the front-facing TrueDepth camera for Face ID. You might have to clean smudges and debris from the screen to prevent them from blocking the camera. A shattered screen, scratched screen protector, and some thick and ultra-rugged iPhone cases might also block a part of the sensor and impact Face ID functionality. If the device detects something blocking the TrueDepth camera, you will get a “camera covered” error message.Avoid blocking your face

Face ID is designed for full-face recognition and works best with an unblocked view of your eyes, nose, and mouth. There shouldn’t be a problem using Face ID while wearing hats, scarves, glasses, and sunglasses. However, polarized sunglasses won’t work, so you’ll have to remove them and try again.

While Face ID should work in most instances, it may have trouble recognizing you if you frequently change your glasses, grow facial hair, or if there’s any drastic shift in appearance. In this case, you should set up an “alternate appearance.” Go to Settings > Face ID and passcode and tap on Set up and alternate appearance. On the Face ID and passcode page, you will also find the option to “Add glasses.” You can add up to four pairs of glasses.

You can set up Face ID to work with a mask if you have an iPhone 12or newer device running iOS 15.4 or later. Go to Settings > Face ID and passcode and enable Face ID with a mask. Go through the Face ID setup process again with a mask on. Face ID will work if you’re wearing a mask and glasses. But it won’t with sunglasses since the “with mask” option requires a clear view of your eyes and the area around them.Check your phone hardware

A known TrueDepth camera issue might stop Face ID from working. You will likely have to send your device for repair if you see an error that says, “A problem was detected with the TrueDepth camera. Face ID has been disabled.” To check your device’s hardware, go to Settings > General > About > Parts and service history.

You will find the option for TrueDepth camera on an iPhone 12 or newer. If everything is working as expected, it should say “genuine Apple part.” But if there’s a problem, you’ll see an “unknown part” error or “Face ID issue detected.” Try updating the device to the latest version of iOS or iPadOS to see if the problem goes away. However, your only option might be to get the device repaired.Hold the device correctly

Using Face ID is almost second nature for iPhone and iPad users. But there is a correct way of holding the device to ensure that the feature works correctly. You can use Face ID in portrait and landscape orientations on the iPhone 13 and iPhone 14 running iOS 16 and any iPad that supports the feature. If you have an older iPhone, you will have to use it in portrait orientation. Make sure that the device is within arm’s length (10-20 inches) and that you are facing the camera.Restart your device and reset your Face ID

If Face ID is not working because of a software bug, restarting your iPhone or iPad may be enough to fix the problem. If nothing works, it’s best to reset your Face ID and set it up again. Go to Settings > Face ID and passcode and tap Reset Face ID. Then select Set up Face ID and go through the setup process again.

Which type of battery for smartphone is better: Li-Ion or LiPo ?

Did you ever think about why your phone works at all?
Probably not. But, if you think about it, all portable gadgets rely on a battery to keep ticking – and some have better battery life than others. That’s why we’re going to take a peek at what keeps your phone ticking and why some batteries do better than others.

On the basis of chemistry used for ions carrying electrolyte material, Lithium battery can be classified into Lithium ion and lithium Polymer.

Lithium ion battery uses liquid lithium ion as electrolyte while lithium polymer use solid or gelatin like polymers as electrolyte.

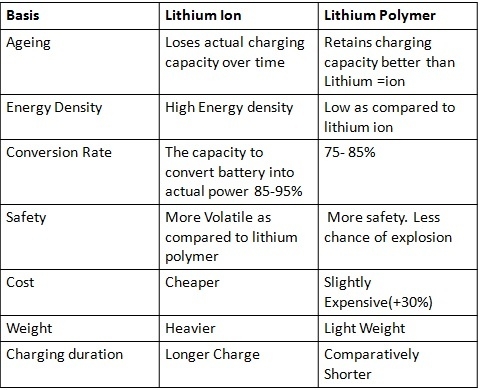
Lithium ion batteries have high energy density and cost less than lithium polymer. Lithium polymer batteries are light weight and have improved safety . However their cost is high (30% average) as compared to lithium ion. Also the the energy density of Li-Polymer battery compared to Li-Ion Batteries is quite less. Lithium ion batteries tend to lose charge with ageing even when not used, while Li- Polymer batteries retain charge for a longer period even while ageing.

This flow chart will clear the doubts:

Lithium Ion Battery vs. Lithium Polymer Battery

Lithium polymer is more advanced but still have its own pros and cons and Lithium ion may be old but upgrading everyday with technology . so, we cannot say that lithium ion or lithium polymer is best for smartphone battery.

Considering the requirements of the smart phone in terms of weight, shape, size, energy density, usage etc , we have to decide, which is best in the case.

Why we need a polymer lithium-ion battery ?

Lithium-ion battery (Li-ion) is widely used in the communication and electronics industries as a high-efficiency energy carrier, especially for personal communication tools such as mobile phones and PDAs. It was first widely used in Japan after commercialization in 1992. Especially with the use of mobile phone communication tools, lithium batteries are gradually accepted by the majority of users due to their advantages of light weight, large capacity and environmental protection.

However, in the past ten years, with the rapid development of communication technology, mobile phone color screen technology, MMS technology, Bluetooth technology and camera technology have appeared successively, which puts higher requirements on the capacity, volume, weight and electrochemical performance of the battery. Traditional liquid lithium batteries have become increasingly unable to adapt to new demands. The emergence of a new polymer lithium-ion battery (Li-Polymer) caters to this demand. Polymer lithium battery is a third-generation lithium-ion battery developed on the basis of the original steel shell and aluminum shell battery. It is lighter, thinner and has higher energy density. It is accepted by domestic and foreign communication terminal manufacturers and design companies.

The fundamental difference between a polymer lithium-ion battery and a liquid lithium-ion battery is that the electrolytes used in the two are different. The electrolyte of a lithium polymer battery is solid in appearance and is called a polymer solid electrolyte. This electrolyte is a type of polymer material which is in a solid state but which dissolves the supporting electrolyte like a liquid and can undergo ion migration. Liquid lithium, as the name suggests, electrolytes are liquid. Due to the fluidity of liquids, changes in external environmental factors such as high temperatures have a greater impact than polymer lithium-ion batteries.

A lithium-ion battery or Li-ion battery is a type of rechargeable battery in which lithium ions move from the negative electrode to the positive electrode during discharge and back when charging.

They are common in home electronics. They are one of the most popular types of rechargeable batteries for portable electronics, with a high energy density, tiny memory effect and low self-discharge. They are used in military, battery electric vehicle, and aerospace applications.

A lithium polymer battery, or more correctly lithium-ion polymer battery is a rechargeable battery of lithium-ion technology using a polymer electrolyte instead of a liquid one.

These batteries provide a higher specific energy than other lithium battery types and are being used in applications where weight is a critical feature — like tablet computers, cellular telephone handsets, or radio-controlled aircraft.

Although the lithium-polymer battery is sleeker and thinner, lithium-ion batteries have a higher energy density and cost less to manufacture.

Finally, with new chemicals and such being added to these batteries often, who knows which will come out on top in the long run.