How to open Control Center on your iPhone without swiping from top: 4 easier ways

You shouldn’t have to perform finger gymnastics just to adjust your screen brightness. Try these alternative ways to open Control Center – no stretching required.

Do me a favor: Grab your iPhone and try opening Control Center one-handed. Bet you can’t, or at least it isn’t easy.

It’s a shame, because that’s where Apple tucks all its quick toggles — from Wi-Fi and Airplane Mode to screen brightness and orientation lock. You’d think these iPhone settings would be easy to reach with one hand, but nope. As screen sizes have ballooned to 7 inches, swiping down from that top-right corner often feels like a literal stretch (especially if you’re juggling coffee or keys).

Fortunately, there are simple workarounds beyond the standard swipe that let you easily and quickly open Control Center.

How to launch Control Center (without swiping from top)

Here are four methods — you just need an iPhone running the latest version of iOS. 1. Reachability

Shift the screen down to your thumb

Reachability is an iOS feature that shifts the top half of your iPhone screen to within your thumb’s reach, making it much easier to tap the Control Center. To use Reachability, simply swipe down along the bottom edge of your display. This built-in gesture works anywhere you can swipe — whether you’re on the home screen or in an app. But you might need to enable it first. 

To enable Reachability, open Settings, then go to Accessibility > Touch, and toggle on Reachability.

To use Reachability on iPhone:

  • With your phone in one hand, swipe down on the bottom edge of the screen.
  • Tap the Control Center area in the top right, which should now be within reach.
  • Swipe up on the bottom edge again (or tap a blank area at the top) to return to full screen.

2. Back Tap

Double- or triple-tap your iPhone’s back

Have you heard of Back Tap? It’s a virtual button on the back of your iPhone. Once enabled, you can summon iOS features — including Control Center — with two or three quick taps. To enable Back Tap, open Settings and go to Accessibility > Touch > Back Tap, then choose Double Tap or Triple Tap, and assign Control Center.

To use Back Tap on iPhone:

  • Hold your iPhone like you normally would. 
  • Tap the back of the phone twice (or thrice).
  • If you’ve setup Control Center, it should instantly slide down.
  • The best part? Back Tap works even with a case on your iPhone. And you can use it anywhere, whether you’re on the home screen, scrolling TikTok, lurking in Instagram, or using any other app.

3. Home-screen shortcut

Create a home screen icon for Control Center

Old habits die hard, and tapping icons on the home screen is one of them. It’s a visual cue we use every day. 

If you want to turn Control Center into a home screen icon (essentially bookmarking it), all you need is Apple‘s Shortcuts app. Don’t worry — it’s not complicated and takes just a few seconds to set up.

To create your shortcut, open the Shortcuts app, tap the + button, search for and add the Show Control Center action, then hit Done. Back in the All Shortcuts view, tap the ••• on your shortcut, open its top dropdown menu, choose Add to Home Screen, and — if you like — customize the name, symbol, and color before tapping Add.

To use your home-screen shortcut on iPhone:

  • From any home-screen page, tap your new Control Center icon.
  • If you’re in another app, swipe to your home screen first and then tap your new Control Center icon.

4. Action button

Press your Action Button to toggle Control Center

OK this last one is exclusive to iPhone 15 Pro and 16 models with a physical Action button. Basically, with a press, it can run a shortcut and open things — like Control Center. 

To change what the Action button does, you’ll repeat some of the steps above. Open the Shortcuts app, select your Control Center shortcut, and edit the action from Show to Toggle (so it both opens and closes). Now, configure the Action Button: Go to Settings > Action Button, select Shortcut, and choose Control Center.

To use the Action button on your iPhone:

  • Press the side button once.
  • If set up, Control Center will slide down or disappear immediately.
  • By default, the Action button is set to silent mode. But you can access that setting in the Control Center.

What is Control Center?

Control Center is the iPhone‘s quick-access panel for settings like brightness, volume, connectivity options, media controls, and more. It’s all in one place and highly customizable, so you can choose what appears there. On newer iPhones without a Home button, swipe down from the top right of your screen to open it. Don’t swipe from the top left — that opens Notification Center.Do these workarounds work on all iPhones?

Reachability, Back Tap, and Home Screen shortcuts require iOS 14 or later.

The Action Button option is exclusive to iPhone 15 Pro and iPhone 16 models.

Can you combine methods?

Sure. There’s no harm in using all of them, and it’s handy to have multiple options for different scenarios.
Apple Face ID not working? Here’s how to fix it

Every recent iPhone, except the iPhone SE, and some iPads use Face ID as the biometric authentication option instead of a fingerprint scanner. It’s easy to set up Face ID on your iPhone or iPad, and you can use it to unlock your phone, sign in to apps, confirm Apple Pay transactions, autofill passwords, and more. Face ID is a quick and convenient security step on your device, but only when it works. Some users face problems with Face ID not working, but there are ways to solve the issue. If Face ID isn’t working on your iPhone or iPad, here’s what you can try to fix it.

QUICK ANSWER

To fix Apple Face ID not working, go to Settings > Face ID and passcode and check the various settings. Ensure that you’ve enabled Face ID for Apple services and third-party apps. You can also add an alternate appearance, train Face ID to work with glasses and masks, or reset Face ID and go through the setup process again. Don’t forget to update the device’s software, and simply restarting it might be enough if Face ID isn’t working because of a software glitch. Your only option is to send the device for repair if Face ID isn’t working because of a hardware issue.Why is my Apple Face ID not working?

Unless your iPhone or iPad has physical damage from an accidental bump or drop, Face ID not working is likely because of a software issue. If it is physical damage, your only option is to send the device in for repair. If your Face ID isn’t working, you’ll see error messages like “Face ID not available” or “Face ID has been disabled.” Other signs to look for include needing multiple attempts to unlock your phone and if you see a prompt to enter a passcode.

There are a few instances where the device may disable Face ID. The feature will stop working after five unsuccessful scans. You may need to enter your passcode if you’ve just turned on or restarted the device or if the device hasn’t been unlocked in more than 48 hours. Face ID will also not work if you’re on the Emergency SOS screen or if you’ve entered the device into Lost mode using the Find My app.

However, Face ID may also not work if there is an issue with the settings, something is blocking the TrueDepth camera, if you’re wearing a mask, the software isn’t updated, and general software bugs and glitches. There are some quick troubleshooting steps you can try, which should fix the problem if it is a software issue.How to fix Face ID not working

Check Face ID settings

There might be an issue with the Face ID settings, especially if it isn’t working with third-party applications. Go to Settings > Face ID and passcode and ensure that Face ID is enabled for the available features. You can enable Face ID to unlock the device and for Apple services like iTunes, the App Store, Wallet, Apple Pay, and Password Autofill.

If you’re having problems using Face ID with third-party apps, go to Settings > Face ID and passcode > Other apps and toggle on the apps you want to use with Face ID.Ensure that nothing is blocking the TrueDepth camera

Your iPhone or iPad uses the front-facing TrueDepth camera for Face ID. You might have to clean smudges and debris from the screen to prevent them from blocking the camera. A shattered screen, scratched screen protector, and some thick and ultra-rugged iPhone cases might also block a part of the sensor and impact Face ID functionality. If the device detects something blocking the TrueDepth camera, you will get a “camera covered” error message.Avoid blocking your face

Face ID is designed for full-face recognition and works best with an unblocked view of your eyes, nose, and mouth. There shouldn’t be a problem using Face ID while wearing hats, scarves, glasses, and sunglasses. However, polarized sunglasses won’t work, so you’ll have to remove them and try again.

While Face ID should work in most instances, it may have trouble recognizing you if you frequently change your glasses, grow facial hair, or if there’s any drastic shift in appearance. In this case, you should set up an “alternate appearance.” Go to Settings > Face ID and passcode and tap on Set up and alternate appearance. On the Face ID and passcode page, you will also find the option to “Add glasses.” You can add up to four pairs of glasses.

You can set up Face ID to work with a mask if you have an iPhone 12or newer device running iOS 15.4 or later. Go to Settings > Face ID and passcode and enable Face ID with a mask. Go through the Face ID setup process again with a mask on. Face ID will work if you’re wearing a mask and glasses. But it won’t with sunglasses since the “with mask” option requires a clear view of your eyes and the area around them.Check your phone hardware

A known TrueDepth camera issue might stop Face ID from working. You will likely have to send your device for repair if you see an error that says, “A problem was detected with the TrueDepth camera. Face ID has been disabled.” To check your device’s hardware, go to Settings > General > About > Parts and service history.

You will find the option for TrueDepth camera on an iPhone 12 or newer. If everything is working as expected, it should say “genuine Apple part.” But if there’s a problem, you’ll see an “unknown part” error or “Face ID issue detected.” Try updating the device to the latest version of iOS or iPadOS to see if the problem goes away. However, your only option might be to get the device repaired.Hold the device correctly

Using Face ID is almost second nature for iPhone and iPad users. But there is a correct way of holding the device to ensure that the feature works correctly. You can use Face ID in portrait and landscape orientations on the iPhone 13 and iPhone 14 running iOS 16 and any iPad that supports the feature. If you have an older iPhone, you will have to use it in portrait orientation. Make sure that the device is within arm’s length (10-20 inches) and that you are facing the camera.Restart your device and reset your Face ID

If Face ID is not working because of a software bug, restarting your iPhone or iPad may be enough to fix the problem. If nothing works, it’s best to reset your Face ID and set it up again. Go to Settings > Face ID and passcode and tap Reset Face ID. Then select Set up Face ID and go through the setup process again.

Which type of battery for smartphone is better: Li-Ion or LiPo ?

Did you ever think about why your phone works at all?
Probably not. But, if you think about it, all portable gadgets rely on a battery to keep ticking – and some have better battery life than others. That’s why we’re going to take a peek at what keeps your phone ticking and why some batteries do better than others.

On the basis of chemistry used for ions carrying electrolyte material, Lithium battery can be classified into Lithium ion and lithium Polymer.

Lithium ion battery uses liquid lithium ion as electrolyte while lithium polymer use solid or gelatin like polymers as electrolyte.

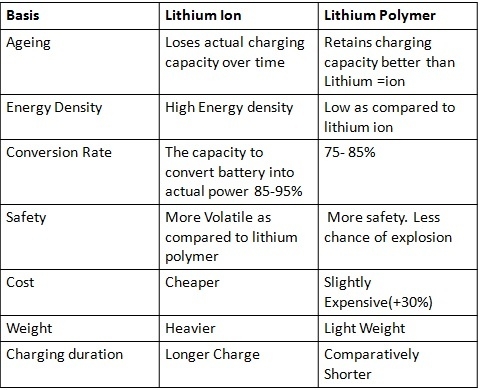
Lithium ion batteries have high energy density and cost less than lithium polymer. Lithium polymer batteries are light weight and have improved safety . However their cost is high (30% average) as compared to lithium ion. Also the the energy density of Li-Polymer battery compared to Li-Ion Batteries is quite less. Lithium ion batteries tend to lose charge with ageing even when not used, while Li- Polymer batteries retain charge for a longer period even while ageing.

This flow chart will clear the doubts:

Lithium Ion Battery vs. Lithium Polymer Battery

Lithium polymer is more advanced but still have its own pros and cons and Lithium ion may be old but upgrading everyday with technology . so, we cannot say that lithium ion or lithium polymer is best for smartphone battery.

Considering the requirements of the smart phone in terms of weight, shape, size, energy density, usage etc , we have to decide, which is best in the case.

Why we need a polymer lithium-ion battery ?

Lithium-ion battery (Li-ion) is widely used in the communication and electronics industries as a high-efficiency energy carrier, especially for personal communication tools such as mobile phones and PDAs. It was first widely used in Japan after commercialization in 1992. Especially with the use of mobile phone communication tools, lithium batteries are gradually accepted by the majority of users due to their advantages of light weight, large capacity and environmental protection.

However, in the past ten years, with the rapid development of communication technology, mobile phone color screen technology, MMS technology, Bluetooth technology and camera technology have appeared successively, which puts higher requirements on the capacity, volume, weight and electrochemical performance of the battery. Traditional liquid lithium batteries have become increasingly unable to adapt to new demands. The emergence of a new polymer lithium-ion battery (Li-Polymer) caters to this demand. Polymer lithium battery is a third-generation lithium-ion battery developed on the basis of the original steel shell and aluminum shell battery. It is lighter, thinner and has higher energy density. It is accepted by domestic and foreign communication terminal manufacturers and design companies.

The fundamental difference between a polymer lithium-ion battery and a liquid lithium-ion battery is that the electrolytes used in the two are different. The electrolyte of a lithium polymer battery is solid in appearance and is called a polymer solid electrolyte. This electrolyte is a type of polymer material which is in a solid state but which dissolves the supporting electrolyte like a liquid and can undergo ion migration. Liquid lithium, as the name suggests, electrolytes are liquid. Due to the fluidity of liquids, changes in external environmental factors such as high temperatures have a greater impact than polymer lithium-ion batteries.

A lithium-ion battery or Li-ion battery is a type of rechargeable battery in which lithium ions move from the negative electrode to the positive electrode during discharge and back when charging.

They are common in home electronics. They are one of the most popular types of rechargeable batteries for portable electronics, with a high energy density, tiny memory effect and low self-discharge. They are used in military, battery electric vehicle, and aerospace applications.

A lithium polymer battery, or more correctly lithium-ion polymer battery is a rechargeable battery of lithium-ion technology using a polymer electrolyte instead of a liquid one.

These batteries provide a higher specific energy than other lithium battery types and are being used in applications where weight is a critical feature — like tablet computers, cellular telephone handsets, or radio-controlled aircraft.

Although the lithium-polymer battery is sleeker and thinner, lithium-ion batteries have a higher energy density and cost less to manufacture.

Finally, with new chemicals and such being added to these batteries often, who knows which will come out on top in the long run.

How to Turn Live Photo into Video: A Complete Guide

In the digital age, capturing life’s precious moments has become easier than ever. Live photos, a feature first introduced by Apple and subsequently adopted by various Android phone brands, bring images to life with a few seconds of motion and sound. Thus, making it desirable for people to learn how to turn live photo into video 2025.What Is a Live Photo?

Live photo is a multimedia feature that combines a static image with a brief video clip and audio recording. When you snap a Live photo, it captures 1.5 seconds of footage before and after the still shot, effectively preserving the essence of the moment. This unique blend of photo and video brings a dynamic touch to your gallery, making your memories more vivid and engaging. This will want people to know how to make a live photo a video.

This dynamic combination creates an interactive experience, allowing you to rekindle the moment by simply pressing the photo for a long time. Whether it’s a smile, a gentle breeze, or laughter shared with loved ones, live photos preserve the essence of the moment and add an extra touch of magic to your photo gallery.Why Convert Live Photos to Video?

While live photos are captivating, converting them into videos opens a realm of creative possibilities. By transforming Live photos into videos, you can add more context, merge multiple Live photos into a seamless story, and share them on various platforms that might not support Live photos. Moreover, videos are more versatile, allowing you to apply filters, edit, and share in a format familiar to a broader audience.

Plus, Live photos help you get the perfect shot while saving you time and storage space instead of taking multiple photos back-to-back.

How to Take Live Photo on HONOR Phone

Taking live photos on your HONOR phone is a breeze, here are the steps to capture this amazing feature on your device. Let’s take HONOR 90 as an example:

Follow these steps:

• Open the camera app on your HONOR 90 phone.

• Ensure the “Photo” mode is selected.

• Look for the “Live photo” icon on the screen (usually represented by a concentric circle or a stylized Live photo text).

• Next, tap the tiny circle icon in the upper-right corner of the screen. A message letting you know that moving pictures are enabled will appear as it turns orange or blue.

Note: Switch to the front camera and choose the Photo mode if you want to capture moving images.

• Frame your shot and press the shutter button to capture the Live photo.

• When taking a moving picture, tap on the shutter icon while keeping the phone as steady as you can for a few seconds.

How to Turn Live Photo into Video on HONOR Phone

Converting your cherished Live photos into videos on HONOR devices can be achieved through various methods, including using dedicated apps or built-in features. In this section, you will learn how to save a live photo as a video. Here’s a step-by-step guide:

Method 1: Using HONOR Gallery App

• Open the HONOR Gallery app on your device.

• Find the Live photo you wish to convert into a video.

• Open the Live photo, and you’ll see options like “Edit,” “Share,” and “More.”

• Tap on “Edit” and look for a “Convert to Video” or “Save as Video” option.

• Select the video quality you prefer (e.g., 720p or 1080p) and save the video to your gallery.

Method 2: Using Third-Party Apps

• Head to your app store and search for “live photo to Video Converter.”

• Install a reliable app of your choice.

• Open the app and grant necessary permissions to access your gallery.

• Select the Live photo you want to convert and choose the video format (MP4, GIF, etc.).

• Tap “Convert,” and the app will process the Live photo into a video.

With the above steps, you can create videos from your Live Photos without any hassle on your HONOR device. You can easily share your memories with those you love through social media platforms or any other media-sharing platforms.

t’s important to note that live photo videos may take up more storage space than regular photos, so be sure to check your device’s storage capacity before creating too many videos.

Conclusion

Live photos add a touch of enchantment to the world of photography, freezing moments in time and animating them with life. With Android brands like HONOR offering this feature, users can capture and cherish their memories like never before. Additionally, by converting Live photos into videos, the possibilities for creativity and sharing become endless.

So, experiment with the methods as to how to turn live photo into video as mentioned in this article and get on a journey of transforming your live photos into delightful videos that will undoubtedly leave a lasting impression on your audience.